A photo may fit neatly on your screen while taking up several megabytes of storage. That can become a problem when an upload form rejects it, an email attachment is too large, or you need a lighter image for a website.
The aim is to reduce the file size while keeping the picture useful. A smaller product photo still needs readable packaging. A tutorial screenshot still needs clear instructions.
You can compress images online with ToolsNest by adjusting the quality, choosing an output format, and optionally setting a maximum width. Your selected images are processed in your browser rather than uploaded to a server for compression.
Below, you will find the steps, advice on choosing settings, and a real example in which a JPG went from 4.28 MB to 1.28 MB.
Table of Contents
File Size and Image Dimensions Are Different
Before changing any settings, distinguish between the amount of data in a file and the number of pixels in the picture.
File size, measured in KB or MB, tells you how much storage the image uses. Dimensions, such as 3000 × 4000 pixels, describe its width and height.
An image can take up less storage space while retaining the same pixel width and height. Resizing reduces the number of pixels and can also make a file smaller.
Which approach should you use? Think about where the image will appear. A large photograph used as a small illustration may have more pixels than necessary. A screenshot with tiny text may need its existing resolution to remain readable.
Keep the original file so you can try different exports without repeatedly compressing an already compressed copy.
How to Compress Images Online with ToolsNest
1. Select a Picture to Work With
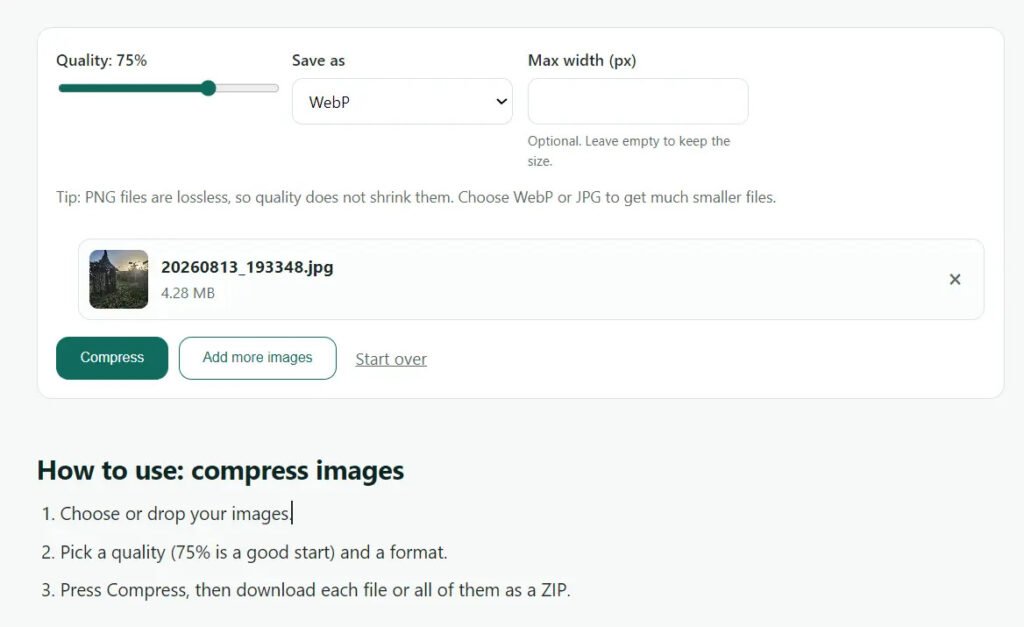
Open the ToolsNest image compressor. Choose your images from your device, or drag and drop them into the tool.
Start with one file while you decide on the settings. Once you are happy with the result, you can process a group of similar pictures.
Avoid treating every image the same. A detailed photograph and a screenshot of small text may need different levels of compression.
2. Adjust the Quality
The tool starts at 75% quality. Use that as an initial setting, then inspect the exported image.
For JPG and lossy WebP output, a lower quality setting generally trades more detail for a smaller file. A higher setting preserves more detail but may produce a larger download.
The percentage is not a predicted saving. Choosing 75% quality does not mean that the output will be 75% smaller.
When reviewing a photograph, look closely at hair, foliage, fabric, and smooth areas such as skies. For screenshots, check that small letters and numbers remain easy to read.
3. Pick an Output Format
The Save as menu gives you three choices: Same as original, JPG, and WebP.
Use Same as original when keeping the existing format matters. Be aware that retaining PNG means the quality slider will not shrink it in the same way as JPG or lossy WebP.
Choose JPG for photographs when the destination requires that format. JPG cannot retain a transparent background, so it is unsuitable for graphics that need transparency.
Try WebP for website images when your publishing platform accepts it. It supports transparency and may provide a useful size reduction. Compare the result instead of assuming it will always be the smallest option.
For more about the format’s features, see Google’s WebP documentation.
If an upload form specifies a format, follow that requirement first.
4. Decide Whether to Reduce the Width
The optional Max width (px) field lets you reduce an oversized image. Leave it empty when you do not want to request a width reduction.
For example, a photograph that is 4000 pixels wide may be unnecessarily large for a destination that needs only 1600 pixels. Reducing the width can help you reach a smaller file size without lowering quality as aggressively.
Allow enough resolution for the intended display, including situations where readers may zoom in.
If you need to set specific dimensions before compressing, use the ToolsNest image resizer.
5. Compress and Download
Press Compress and review the reported file sizes.
Download each result separately, or choose Download all (ZIP) when working with multiple images.
Open the downloaded file before publishing it. Confirm that it works in the application or website where you plan to use it, and check the details that matter for that picture.
A Real ToolsNest Compression Test
For this example, we selected a JPG photograph with original dimensions of 3000 × 4000 pixels.
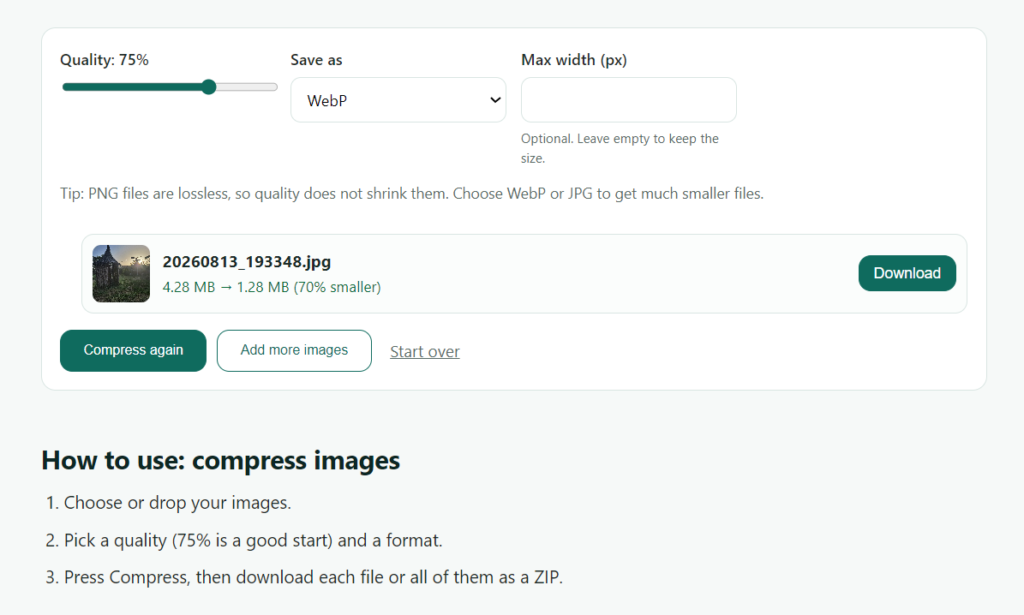
We chose WebP, kept quality at 75%, and left Max width empty. This tested a format change and compression without requesting a smaller width.
The tool displayed these results:
| Test detail | Setting or result |
| Original format | JPG |
| Original dimensions | 3000 × 4000 pixels |
| Original size shown by the tool | 4.28 MB |
| Output format | WebP |
| Quality setting | 75% |
| Maximum width | Left empty |
| Output size shown by the tool | 1.28 MB |
| Reported size reduction | 70% |
Converting this JPG to WebP saved roughly 3 MB, cutting the file’s storage size by around 70%.
This result includes both converting from JPG to WebP and applying the selected quality setting. It does not demonstrate the effect of the quality slider alone.
The screenshot records the settings and file-size result. It does not establish that the exported image looks identical to the original. That requires opening both files and comparing them.
Your results may differ. A picture that has already been compressed, or one with different textures and detail, may respond differently to the same settings.
Starting Settings for Different Images
Use these suggestions to choose a first export, then adjust according to the downloaded result. They are starting points, not measured results from the test above.
| Image type | Format to compare | Initial quality | Main detail to inspect |
| General photograph | JPG and WebP | 75–85% | Faces, textures, and shadows |
| Product photograph | JPG and WebP | 80–90% | Labels and surface detail |
| Screenshot with small text | Original format and WebP | 85–95% for lossy output | Letters, numbers, and thin lines |
| Transparent graphic | Original PNG and WebP | Compare suitable exports | Transparency and object edges |
A screenshot can become less useful even when the quality loss seems small. If a reader cannot distinguish a number or menu label, the file needs a different setting.
Why an Export Might Still Be Too Large
The Source Was Already Compressed
Images saved from messaging apps or other websites may already have little room for further reduction.
Another export can produce a similar size or a larger file. Check the actual output rather than assuming every compression attempt is an improvement.
You Kept PNG as the Output Format
PNG uses lossless compression. Lowering the quality control does not provide the same reduction when the exported file remains PNG.
Compare WebP if the destination accepts it. For photographs without transparency, JPG is another option. Check logos and text carefully because a smaller file can introduce unwanted changes around sharp edges.
The Image Contains More Pixels Than You Need
If reducing quality makes the picture look worse before it becomes small enough, review the dimensions.
A suitable width with moderate compression may produce a more useful result than retaining a very large resolution at a low quality setting.
There is no universal file-size target. A decorative thumbnail and an illustration containing detailed instructions have different requirements.
Check the Result Before Using It
First, view the compressed image at the size it will appear to readers. Then inspect important areas more closely.
For a product photo, examine packaging text and material texture. For a portrait, check the face and hair. For a tutorial, read the smallest instruction.
Also check whether the output format suits the destination and whether transparency has been preserved when needed.
If you are trying to stay below an upload limit, make gradual changes and inspect each export. The quality setting does not guarantee an exact file size.
Are Images Uploaded During Compression?
The ToolsNest image compressor processes selected pictures locally in your browser. The compression workflow does not upload those image files to a ToolsNest server.
The website still uses internet connections to load pages and resources. Website cookies and analytics are separate from local image processing and are explained in the ToolsNest Privacy Policy.
Frequently Asked Questions
Can I compress multiple images together?
Yes. You can select several images and download the outputs individually or as a ZIP. Try a smaller batch if large files put too much demand on your device.
Can compression fix a blurry picture?
No. Reducing file size does not recover detail that is missing from the source. Strong compression may make existing blur more noticeable.
Does 75% quality always give a 70% reduction?
No. The 70% saving belongs to the specific JPG-to-WebP test described above. Different files can produce very different results at 75% quality.
Should I compress the same JPG repeatedly?
Use the original when trying another setting. Repeated lossy exports can introduce additional deterioration, making it harder to judge the best result.
What should I do if processing stalls?
Try one image at a time and keep the tool’s tab open. If the page appears unresponsive, reload it and select the original again. Processing can be affected by available memory, browser behavior, or a page error.
Prepare a Smaller File You Can Still Use
Start with the destination’s requirements: accepted format, useful dimensions, and any upload limit. Then adjust compression while checking the details your viewer needs.
In our example, a JPG converted to WebP at 75% quality went from 4.28 MB to 1.28 MB. That is a useful reference for one photograph, rather than a promised saving for every image.
Try the ToolsNest image compressor, download a copy, and compare it with your original before publishing.