I wanted to keep one useful panel from a screenshot without including the website navigation, empty margins, and Windows taskbar around it. Making the whole screenshot smaller would have kept those distractions and made the text harder to read.
Instead, I used the ToolsNest image cropper to select the panel itself.
This walkthrough shows how to crop images online using a movable selection and exact pixel values. It also includes something I checked after downloading: the cropped image had smaller dimensions, but its file size increased. That result is worth understanding before you use cropping to prepare images for a website.
Table of Contents
What I Wanted to Keep in the Screenshot
My starting file was a 1000 × 465 WebP screenshot of a ToolsNest word-counting interface. The useful section was the central panel containing the text box, results, and buttons.
The navigation above it and the Windows taskbar below it did not help explain that panel. There was also unused space on both sides.
My goal was to remove the surrounding areas while keeping the complete panel. I did not need a square thumbnail or a smaller version of the entire screen.
That distinction helped me choose the right crop settings.
How to Crop Images Online with ToolsNest
1. Open the Source Image
Go to the ToolsNest Crop Image tool and choose your image.
Keep the original file. If you later discover that a label or button was cut off, you can return to the source and make a wider selection.
For screenshots, first decide what the reader needs to see. A useful crop might include a setting and its label, an error message with enough surrounding context, or a complete results panel.
2. Match the Crop Shape to What You Want to Keep
The Shape menu includes Free, Square 1:1, and several rectangular ratios.
I used Free because my panel was wider than it was tall. This allowed me to set its width and height independently.
A fixed ratio makes sense when the destination requires a particular shape. For example, Square 1:1 keeps the selection square as you adjust it. It does not guarantee that everything you want will fit inside.
Choose the shape before fine-tuning the selection, because changing the ratio can reposition or resize the crop area.
3. Position the Selection
You can draw a selection on the image, drag inside it to move it, or pull a yellow corner to change its size.
The highlighted area is the part you will keep. Check all four edges before downloading.
For my screenshot, I watched the right edge carefully: the text box, scrollbar, and rightmost results needed to remain inside the selection. Even a slight error at the selection’s edge can leave out a label or part of a control that the reader needs.
4. Enter Exact Values When Needed
The X, Y, Width, and Height fields let you place the selection precisely.
| Field | What it controls |
| X | Distance from the image’s left edge to the selection’s left edge |
| Y | Distance from the image’s top edge to the selection’s top edge |
| Width | How many pixels the selected area spans horizontally |
| Height | How many pixels the selected area spans vertically |
These measurements refer to the source image, even when the preview appears smaller on your screen.
For my custom image crop, I used:
| Setting | Value |
| Shape | Free |
| X | 245 |
| Y | 70 |
| Width | 500 |
| Height | 340 |
| Save as | Same as original |
After typing a value, click outside the field or move to the next one so the change is applied.
To crop an image to exact dimensions, enter the required width and height, then check the position. Those dimensions describe the area you are keeping; they do not scale the whole source into that space.
5. Download and Inspect the Result
Click Crop and download, then open the saved file.
Check the actual image rather than relying only on the selection preview. Look for clipped letters, missing borders, or buttons that sit too close to an edge.
Also check the downloaded dimensions and file size. In this test, both were inspected from the resulting file.
My Crop Test: Settings and Verified Result
My first square crop did not achieve the goal. It retained the navigation and taskbar while cutting off part of the panel on the right.
I switched to Free and set the selection to 500 × 340 pixels. With X at 200, the selection still sat too far left. Moving X to 245 brought the complete panel inside the crop.
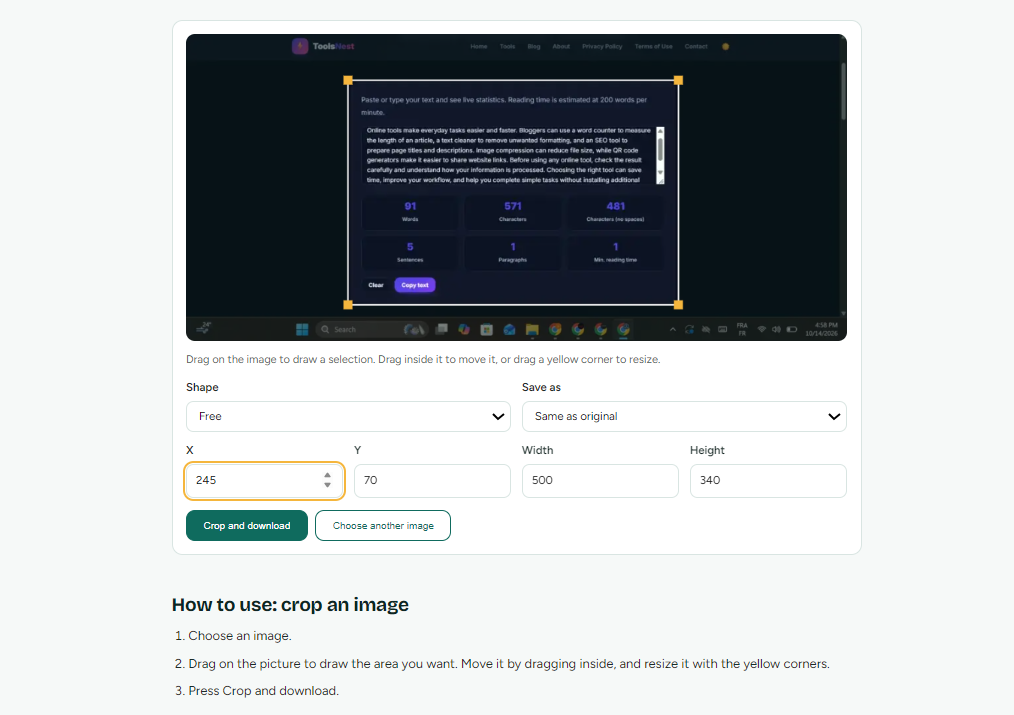
The final selection enclosed the panel while leaving the navigation, taskbar, and surrounding margins outside.
The downloaded file measured 500 × 340 pixels. It contained the text box, all six results, and the Clear and Copy text buttons.
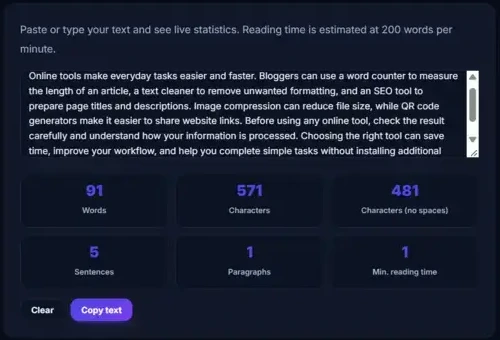
The downloaded crop retained the complete panel in a 500 × 340 image.
Here are the measured results:
| Measurement | Original | Final crop |
| Format | WebP | WebP |
| Dimensions | 1000 × 465 px | 500 × 340 px |
| Exact file size | 20,524 bytes | 28,166 bytes |
| Approximate size (KiB) | 20.0 KiB | 27.5 KiB |
| Included content | Full screenshot | Selected tool panel |
The screenshot shows an earlier ToolsNest interface. It is the source material for this cropping demonstration, rather than a preview of the current crop tool.
Why the Cropped File Was Larger
The final image contained fewer pixels, yet it used more storage. Cropping and compression do not measure the same thing.
Cropping determines which area remains in the picture. When the tool exports that area, it creates a newly encoded image. The output format and encoding settings affect the resulting file size.
The Same as original option kept my file in WebP format. It did not preserve the original file’s compression settings or guarantee fewer bytes.
For technical background, MDN explains how browser canvas image exports use format and quality settings.
The practical lesson from this test is to check both measurements separately:
- Use dimensions to confirm the selected area.
- Use file size to confirm whether the download meets your upload limit.
If the crop is correct but the file needs to be lighter, try the ToolsNest image compressor. Our compression walkthrough shows a separate test of that process.
Free Crop or Fixed Aspect Ratio?
The best choice depends on what you need to preserve.
| Task | Suitable starting choice | What to check |
| Crop a screenshot around a settings panel | Free | Labels, buttons, and panel borders |
| Prepare a square thumbnail | Square 1:1 | Whether the subject fits comfortably |
| Select a wide rectangular scene | 16:9 | Details near the top and bottom |
| Keep a tall section of an image | 3:4 or 9:16 | Whether the narrower frame cuts off content |
A ratio describes the selection’s shape, not a single output size. A square crop could be 300 × 300 or 800 × 800, depending on the source and your selection.
If the composition is right but you need a different output size, crop first and then resize. The ToolsNest resizing guide explains how to change dimensions while keeping proportions.
Keeping a Screenshot Useful After Cropping
A tighter frame is not always a better frame. Keep enough information for the reader to understand what is being shown.
For a settings screenshot, include the setting name as well as its value. For an error, keep the complete message. For a results panel, check the labels beneath the numbers.
In my test, keeping all six results mattered more than producing a square image. The rectangular crop suited the content.
Text also needs enough pixels to remain readable. Cropping removes the surrounding area; it does not sharpen letters that were already blurry. If the source text is unclear, capture a clearer screenshot before editing.
Before adding the crop to your article, check that the layout will not enlarge it beyond its saved pixel width. My result is only 500 pixels wide, so it should be displayed with that limitation in mind.
Common Cropping Problems
Part of the Content Is Missing
Reopen the original and adjust the selection. Move it if the size is correct, or make it larger if the content needs more room.
Check the edges before downloading again.
Width and Height Keep Changing Together
Check the Shape menu. A fixed ratio links those measurements. Choose Free when you need independent dimensions.
The Crop Is in the Wrong Place
Review X and Y. Changing width and height alone does not necessarily move the selection over the intended content.
My test needed an X adjustment even after the output dimensions were set correctly.
The File Is Bigger Than Before
Check the exported format and file size. A smaller selected area does not guarantee a smaller encoded file, as this WebP test demonstrated.
You Need More Context After Saving
Use the original image to make another crop. The downloaded crop does not contain the surrounding pixels that were left out.
Frequently Asked Questions
Can I crop WebP images and keep the WebP format?
Yes. In this test, I selected Same as original and the downloaded file remained WebP. You can also select WebP from the output menu.
Does cropping stretch the content?
Cropping selects an area from the source. The content inside that area keeps its shape. Stretching can happen later if you display or resize the result with mismatched proportions.
Can I use the same coordinates for every screenshot?
Only when the source dimensions and content positions match. Different window sizes or layouts can move the panel, so inspect each selection before exporting.
Will a square crop keep the whole image?
Usually not when the original is rectangular. A square selection leaves out some of the source. If you must retain everything, consider placing the image on a square canvas with space around it instead.
A Useful Crop Starts with a Clear Purpose
For this screenshot, the useful result was a complete panel without the surrounding desktop and navigation. Recording the four crop values gave me a way to recreate the selection, while opening the saved file let me verify its dimensions and content.
Before your next crop, identify what the reader needs, inspect the selection edges, and check the saved file. You can follow those steps in the ToolsNest image cropper using either a free selection or a fixed shape.